Organize your BookWidgets account and start fresh next school year
 Lucie Renard —
This post was updated in August 2025 - Now the school year is over, there's just one more thing to do: organize your BookWidgets account so you can start the next school year with a clean slate.
In this post, I'll give you lots of tips on these three topics:
Make sure to also check out the webinar recording with all these tips

Clean up student work in BookWidgets
Starting a new school year is always easier when you can start fresh. This also goes for your BookWidgets account, or more specifically, for your student work.
Last year, your students have submitted tons of widget results, so all that work is now lingering in your account. You don't need to have them readily available anymore but may want to hang on to them in case your school audit or inspection asks for them in the future.
There are a few things you can do with student work from last school year.
But first this: Whatever you do, be careful when deleting student work. Be sure you really won't need it anymore. Deleting results cannot be reversed.
1. Student work per school year
 All the results of the previous year will be automatically stored. This way, you'll start the new school year with no student results. A clean slate. Of course, you can always look for stored student work when needed.
This is where you can find it:
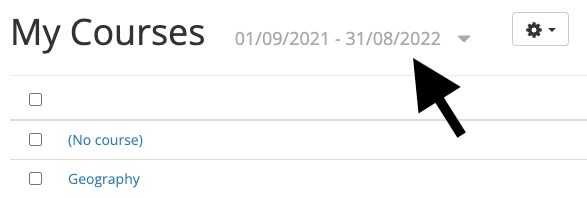
- On your BookWidgets dashboard, go to the "My Courses" page (or, if you don't use an LMS, to the "Student Work" page) under "Grades & Reporting"
- Next to your courses, you can find some dates. This should be the beginning of your school year and the end.
- Click on it and you'll see that all student results are listed within the correct school year. This happens automatically.
- Click on "Edit" if you want to change the school year dates for your country.
- When you navigate to older student work, you'll see that you can "Show archived results" too.
2. The archive
 When you're in the middle of a school year, and you have so many student results coming in, it might be a good idea to archive (not delete!) the student results you don't need anymore. For example, when the grades or feedback is already in their grade book.
You can archive student work within complete courses, classes, or separate assignments. Just check the course or assignment, click on the "cogwheel icon ⚙️", and choose "Archive".
If you need it later, you can find the archived results either on the "Archive" page under "Grades and reporting", or by using the "Show archived results" on your course page.
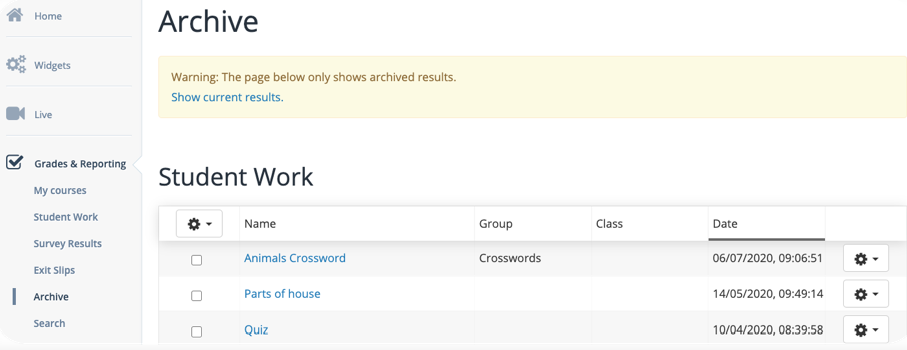
Archived results don't have a separate structure. Although you can't for example create folders for separate school years, read on to learn how you can use the search function to find back the results you want.
3. Search for student work
 The search function is a really handy tool when you want to look for specific
results, even archived results. Let's say your school administration
asks you to show some tests and results about a particular theme or
from a particular course or class, or for a specific student for a specific
period.
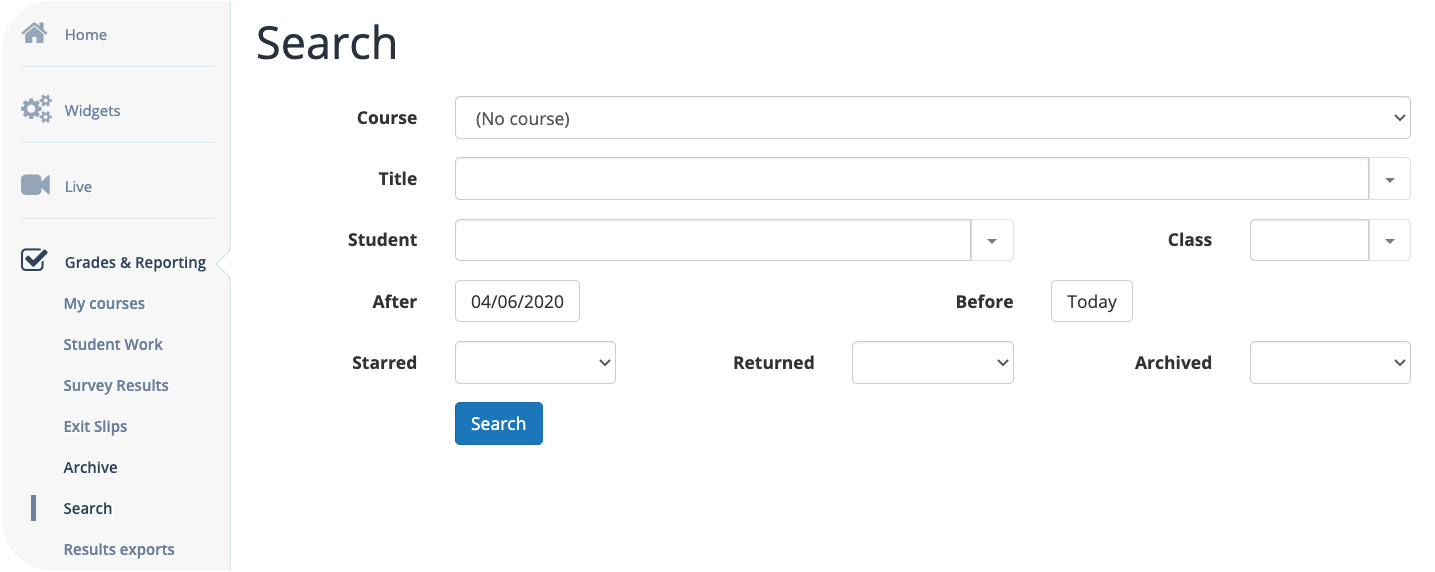
Just go to "Grades and reporting" and click on "Search". Now select the right filters, and the student work will show up.
4. Export results
 If you want to keep an offline copy of all your results you can export all the student results within a certain
period of time. Indicate the period, click on export, and download the
results. Exporting results can take several hours, depending on the number of
results.
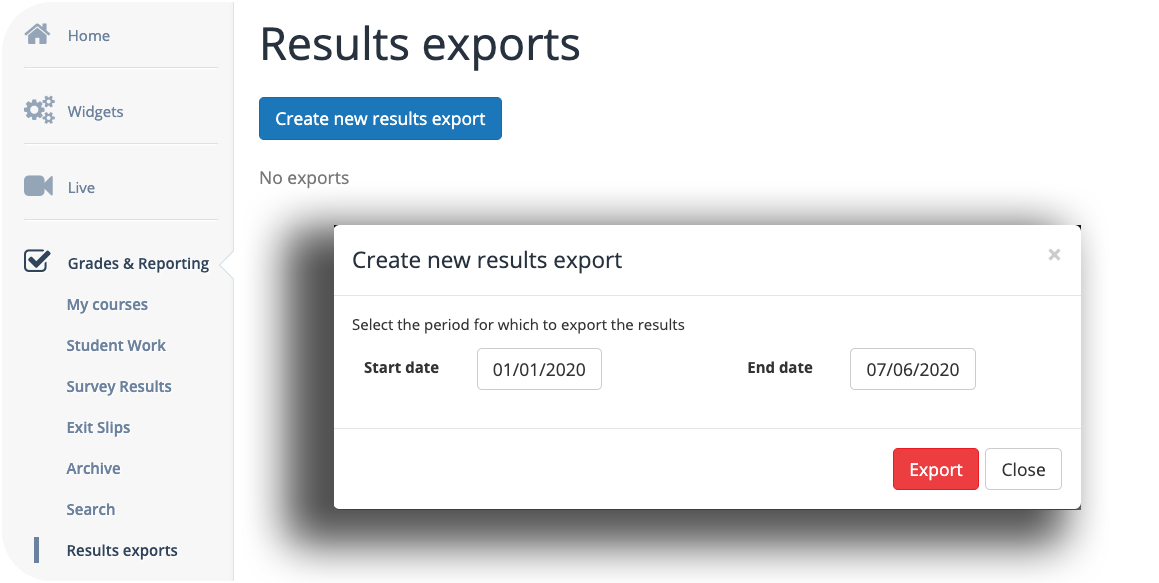
Once downloaded, you can extract the package, and get all your student results nicely organized in a folder structure. Click on the work of a student in the folder of the assignment to open that student's work offline in your browser. You can click on the title to open the widget linked to these results.
5. Remove students from your courses
 When starting a new school year, you may still see old students listed in your
courses. The list of students shown for classes in the "Grades & Reporting"
section is automatically derived from the student work that's sent in.
To remove students from the list, you need to archive (or delete) their student work.
6. Reset widget activity
 This action actually has nothing to do with student work. As students fill out a widget their work will be sent to you and their work will be stored forever (unless you decide to delete this).
As you know, when students complete a widget and come back later to the widget again, they will still see their answers. This is great for when you want your students to continue working on a widget that wasn't completed yet. BUT. When you have students that redo their year, they will open this exact same widget later on again and still see their answers from last year. We don't want that to happen...
That's why widget activity will be automatically reset every school year (note that the student work is still safe here). Make sure to check whether the reset date matches your first day of the new school year. This is not the same in all countries. Go to "Account", "My account" and scroll down to "Widget activity"


Clean up your widget lists in BookWidgets
Now your students' results are stored safely, you might want to take a look at your widgets. Here are a few tips to bring structure to your widgets list.
1. Add folders
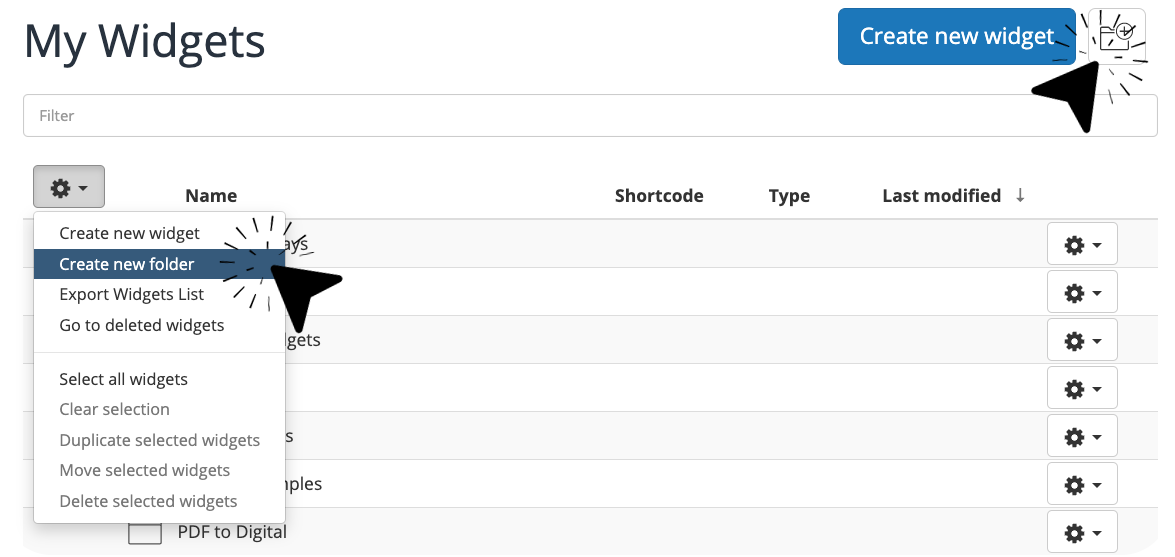
 Add folders using the cog wheel menu on top of your widget list. Now, drag and drop widgets to your newly created folder. You can also move a widget by choosing 'Move' from the dropdown menu on the right of the widget.
You can even add folders to folders. This makes it easy to organize all your widgets and bring structure to your BookWidgets account.
2. Delete widgets you don't need
 Nothing is more annoying than a widget list full of "unfinished" widgets. Unfinished widgets are widgets you created but didn't share with your students. So, ask yourself: do you still need these widgets?
Most of the time, this unfinished widget was just a test to try something out or see what's possible. Then, you realize this isn't the right widget type.
Delete the widgets you don't use or that are empty. Start with checking the unfinished widgets. Make sure to take a look first, before you delete it.

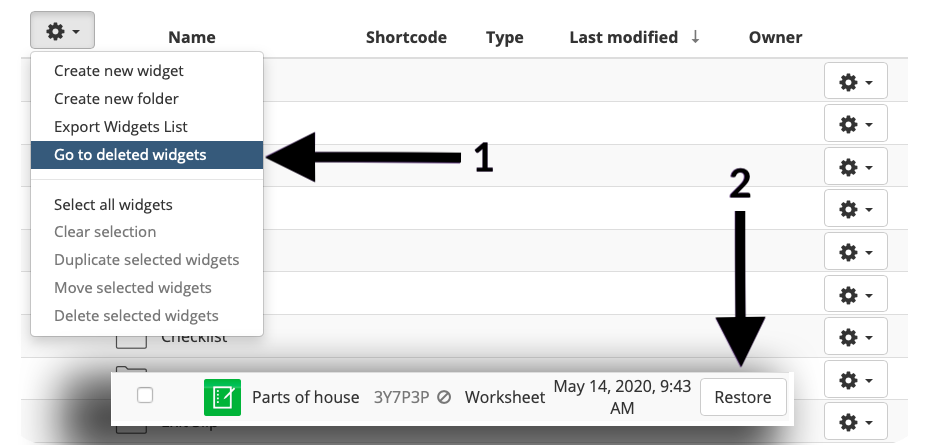
When you accidentally deleted a widget you still might need later on, just click on the cog wheel menu and choose "Go to deleted widgets". Here you can restore accidentally deleted widgets.
3. Find widgets using the filter
 Preparing already for the next school year? Then you need to know what widgets you already have and if you want to make some changes or not. Or maybe you just want to organize all your widgets and move them to the right folders.
But what if you can't find a widget? Use the "Filter" search bar on top of your widget list.
Filter on
- the widget's name/title (or just a part of it),
- a widget shortcode,
- a widget type.
You can also use the filter when you're a member of a large BookWidgets group where other teachers share widgets as well. If you don't know if the widgets in that group are what you're looking for, filter on a theme, title, or particular course. You immediately know if the group has widgets with your content.
The "Filter" works within that particular widget list/group. So if you have different groups with widgets, you'll need to filter there as well.
4. Make widgets inaccessible
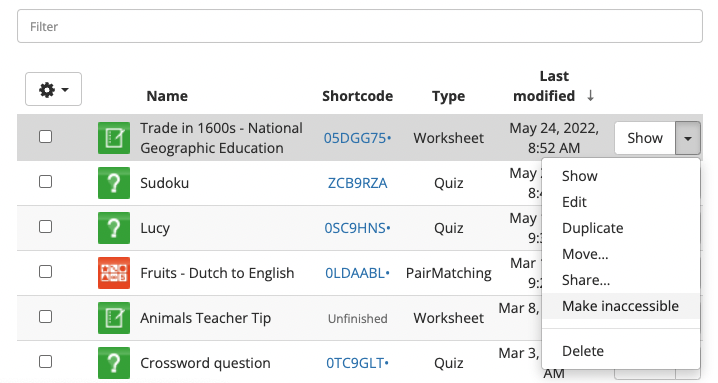
 When you've shared all your widgets to Google Classroom, Microsoft Teams, or another LMS, they are available and accessible to students already. Instead of emptying your Learning management system so students can't access the widgets by accident, you can make your widget inaccessible. This means that they are still shared with your students, but they won't be able to complete your widgets.
When you're ready for your students to complete them, just make them accessible again with a few clicks within BookWidgets. You don't have to share your widgets again as they are still in your LMS, waiting for your instructions.
5. Add descriptions to your widgets
 Besides giving your widget a name or title, you can now also provide a short description only visible to the teacher.
This way, you can remind yourself of different levels or versions within your widgets. It makes it easier for you to distinguish widgets from one another in your widget list.

Just click to edit the name of the widget. A description field will appear just below.
6. Add information about your widgets
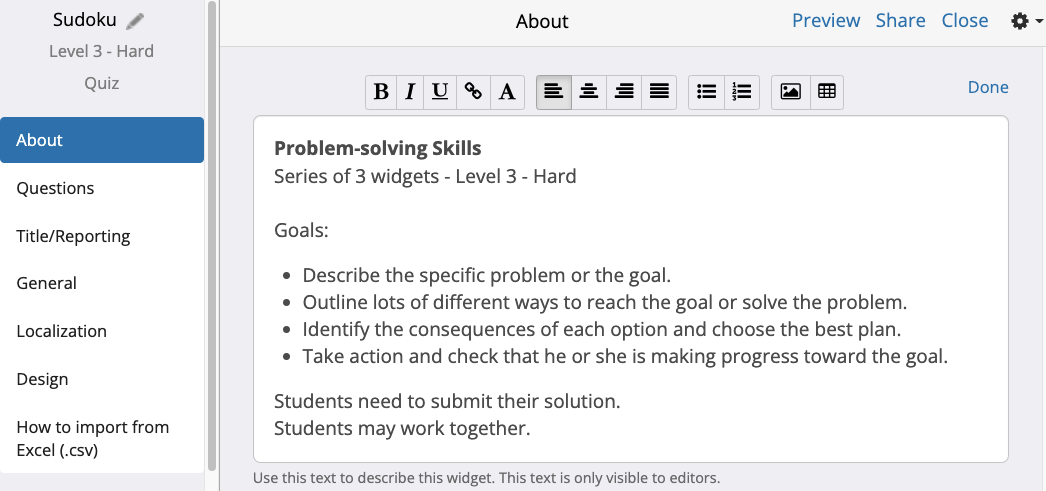
 Under the "About" tab in the widget configuration, you can provide more information about your widget; suggestions include an explanation about the widget, a date, a learning goal, or teaching standards.
This can also be handy for colleagues to immediately understand the intention of a widget when you share it.
This information is not visible to students. You may consider it a "personal educator note".
You often create widgets to use later on, or even to reuse the year after. With some clear information in the "About" tab, you get a quick reminder of your intentions when you created this widget a while back.

Create new widgets at full speed
You now have an organized account. All you have left to do is start creating new lessons for the new school year. We've some amazing tips that will help you create new BookWidgets lessons more efficiently.
1. Import Word and PFD documents into BookWidgets
 You can now import questions from your existing DOCX and PDF documents into quizzes and (split) worksheets. You probably have so many Word and PDF materials lying around, waiting for you to put them in BookWidgets. Within a few minutes, you can transform your existing hand-out into BookWidgets assignments.
Please, a moment of silence to get your mind blown.... 🤯
Get started importing your documents now and you'll have little work to do during the new school year. Read all about this document import feature within BookWidgets in this elaborate post with an instruction video.
2. Create widget templates
 Are you using the same widgets with the same settings over and over again?
For example, suppose you're always using a worksheet widget for testing. You're also using the same worksheet settings for all your tests. When you create a new widget, those options will be reverted to the default options, and you'll always have to change them again.
Here's what you can do to make this easier:
- Add a folder named "Templates" with the widgets you use the most.
- Configure the widgets how you want them to be, with the right submission and general settings, or a background you always use.
- Give the widget a name such as "reading comprehension template".
Whenever you want to create a new reading comprehension assignment, go to the templates folder and duplicate the "Reading comprehension template" widget. Now, just add your questions/ content. You don't have to add a background or change the settings, because you just made a copy of the template widget with all the right settings. This will save you a lot of time!
Besides having all the right settings in your template, you might want to take a look at the design setting too. Check out this post with some tips for designing your widgets.
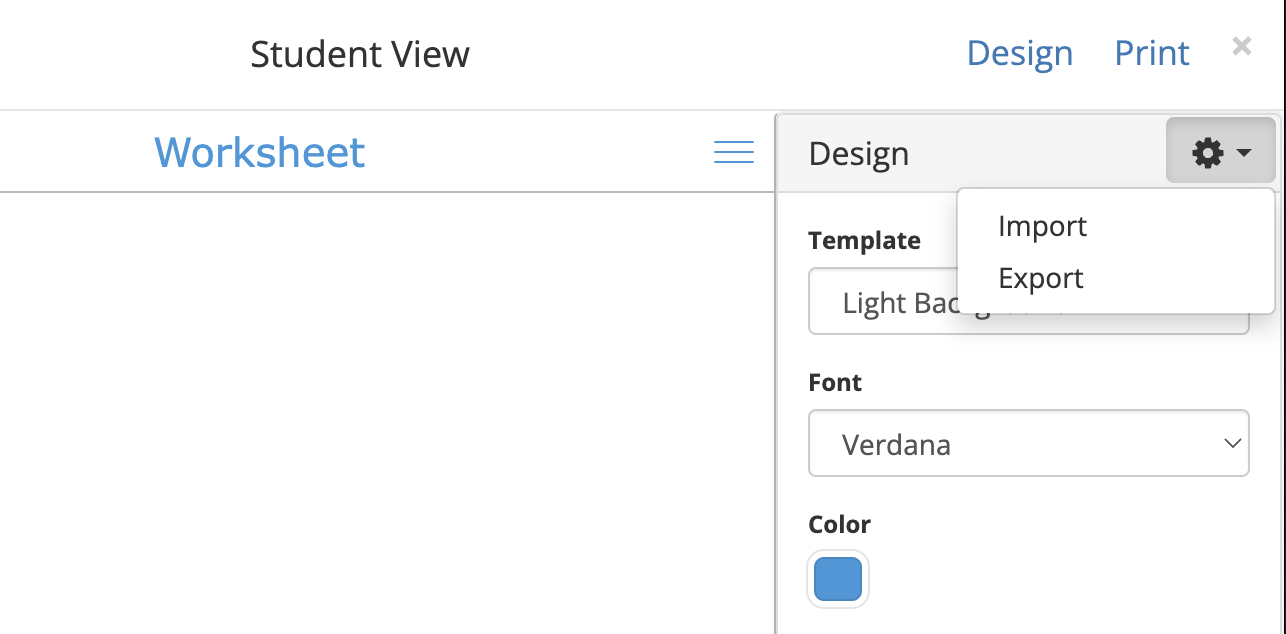
You also create a design template for each widget and store it on your computer. Later, when you’ve created a new widget, you can easily import that design template to that widget, changing the design immediately to the right settings.
- Create a new widget and go to "Preview", "Design"
- Configure your design
- Click on the cogwheel in the upper right corner and export this template.
- Whenever you're creating a new widget, follow the same steps and click on "Import". You can now Import the design template you just created into this new widget.
3. Create a question bank
 Gather a set of questions within a worksheet or a quiz or create large question banks for different themes within your course. Whenever you want to create an assignment of that theme, you can quickly set one up, within minutes.
Of course, you already did the hard work once. Over the years you can keep adding questions to your question bank. This makes it easier to create different tests and assignments that aren't exactly the same as the year before.
Create your question bank
- Create a new widget and choose a Quiz or Worksheet widget
- Add all your different types of questions to this widget.
- Create one text question type to give clear instructions to students when they have to finish a test or assignment. These are instructions you always use at the beginning. If you have them in your question bank, you can easily import this to your new assignments without doing this over again all the time.
- Save this widget within a folder named "Question banks". Make sure to use the right theme/ topic as a title. You can also enter a description just below the widget name.
Use your question bank
- Create a new widget (Quiz, Worksheet, or Split Worksheet)
- Click on the cogwheel icon ⚙️ in the upper right corner
- Choose "Import from widget"
- Navigate to your question bank folder and choose the correct question bank widget
- Select the questions you want to use in your assignment and click "Import".


Webinar - Organize your BookWidgets account
We have it on tape! A lot of tips mentioned above we've shown in our webinar series. Take a look at this free 1-hour webinar.
P.S. There's one in Dutch too!
That's it!
Now you can start the new school year with an organized BookWidgets account and some new materials. Make sure to share this post with fellow widgeteers! AND don't forget to join our Facebook group for teachers teaching with BookWidgets.
